...
In a first instance, we have installed SeisFinder v2 on dev01-quakecore. This is the machine where our beta testers will use it.
To start testing on dev01-quakecore, enter:
| Code Block |
|---|
$ssh username@dev01-quakecore
username@dev01-quakecore:~$ cd /var/www/seisfinder2 |
And go straight to Step 6 in the following installation instruction.
If you wish to test on your local machine, please follow the instructions from Pre-requirements.
Pre-requirements
The following version of software must be installed:
...
| Code Block |
|---|
$cd seisfinder2 /seisfinder2 $ python manage.py runserver |
If you clone the files successfully, you should be able to see something similar to this:

...
3.Migrate data structure from Django to database
| Code Block |
|---|
$cd$ cd seisfinder2 # delete migration cache if exits /seisfinder2$ python manage.py makemigraitions seisfinderapprm -rf seisfinderapp/migrations # apply migrations to database /seisfinder2$ python manage.py migratemakemigrations seisfinderapp /seisfinder2$ python manage.py migrate |
...
Sample CSV and Hazard data for populating the database are located at username@dev01-quakecore:/rcc/home/varprojects/wwwquakecore/seis2Data.
Type the following command and come back after lunch.
| Code Block |
|---|
# First, create a folder called 'private' under your git repository seisfinder2 $ cd seisfinder2 /seisfinder2$ mkdir private # Then create a folder called 'data' under private/ /seisfinder2$ cd private /seisfinder2/private$ mkdir data # General copy command: scp -r username@remoteserver:remote_path_to_copy_files local_path_to_put_copied_files.eg # add sudo if permission denied # if still permission denied, type the following command in the dev01-quakecore server to change permssion username@dev01-quakecore $ sudo chmod 755 /rcc/home/projects/quakecore/seis2Data/private/data/cybershake17p8_csv # Now copy files from remote server to your local machine # cybershake17p8 csvs scp -r gg999@dev01-quakecore:/rcc/home/projects/quakecore/seis2Data/private/data/cybershake17p8_csv home/gg999/seisfinder2/private/data/ # darfield csvs scp -r gg999@dev01-quakecore:/rcc/home/projects/quakecore/seis2Data/private/data/darfield_csv home/gg999/seisfinder2/private/data/ # hazard data scp -r gg999@dev01-quakecore:/rcc/home/projects/quakecore/seis2Data/private/data/hazard home/gg999/seisfinder2/private/data/ # event data scp -r gg999@dev01-quakecore:/var/www/seis2Datarcc/home/projects/quakecore/seis2Data/private/data/event home/gg999/seisfinder2/private/data/ |
5.Inserting the CSV and Hazard and
...
Event data to seisfinder2 database
(1) First, start the Django server
| Code Block |
|---|
$cd seisfinder2 # if running local host /seisfinder2 $ python manage.py runserver # if running from the dev01-quakecore server # first change file permission if permission denied use: /seisfinder2 $ sudo chmod 755 /rcc/home/projects/quakecore/seis2Data/private/data/cybershake17p8_csv # then /seisfinder2 $ sudo python manage.py runserver 132.181.39.127:8000 # else use 'ifconfig' to figure out the IP address of your server |
(2) Now the server is running, let's insert cybershake17p8 CSV data.
Open a browser, go to the following address and the insertion will start automatically, you'll see lots of terminal output.
| Code Block |
|---|
# The 'root_dir=' is the absolute path where you just put the copied data in step 4. Eg. # local host: http://127.0.0.1:8000/seisfinderapp/insert?root_dir=home/gg999/seisfinder2/private/ |
...
data/ |
...
cybershake17p8_csv&type=cybershake

# dev01-quakcore:
http://132.181.39.127:8000/seisfinderapp/insert?root_dir=/rcc/home/projects/quakecore/seis2Data/private/data/cybershake17p8_csv&type=cybershake
|
After about 9 minutes, if the CSV data is inserted successfully, terminal output: final result=OK.
And you should get 11458 if performing the following sql command in postgres

Repeat the same procedure for inserting darfield csv data with the following code:
| Code Block |
|---|
# local host:
http://127.0.0.1:8000/seisfinderapp/insert?root_dir=home/gg999/seisfinder2/private/data/darfield_csv&type=historic

# dev01-quakcore:
http://132.181.39.127:8000/seisfinderapp/insert?root_dir=/rcc/home/projects/quakecore/seis2Data/private/data/darfield_csv&type=historic |
After terminal output 'final result= OK', type the following command in postgres and you should get two rows like this:

(3) Now let's insert hazard data. Doesn't matter if the Django server is running or not.
| Code Block |
|---|
/seisfinder2 $ cd sqlsts #inserting hazard data.replace 'home/gg999/seisfinder2/seis2Data/hazard_data' with the absolute path that you put the copied data at in step 4.eg /seisfinder2/sqlsts $ python insert_hzd_paths.py home/gg999/seisfinder2/seis2Dataprivate/data/hazard_data |
if the insertion of the hazard data is successful, you should get 8534 when performing the following sql command

(4) Now we insert event data. Doesn't matter if the Django server is running or not.
| Code Block |
|---|
#inserting event data
/seisfinder2/sqlsts $ python insert_acc_path.py home/gg999/seisfinder2/private/data/event |
After insertion, type the following command in postgres and you should get 1 row.


6.Testing
Now you've finished all the installation steps. Let's do some test to see if the python scripts can run with the database smoothly. The two scripts that need to be tested are hazard_search.py and event_search.py:
(1) To see the detailed usage of hazard_search.py and event_search.py, type:
| Code Block |
|---|
/seisfinder2/sqlsts $ python hazard_search.py -h

/sesifinder2/sqlsts $ python event_search.py -h |
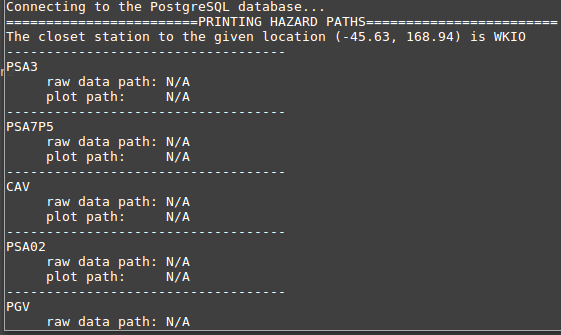
(2) Sample test Test for hazard_search.py
| Code Block |
|---|
$cd seisfinder2/sqlsts seisfinder2/sqlsts $ python hazard_search.py -q Cybershake17p8 -45.63 168.94 |
Output:
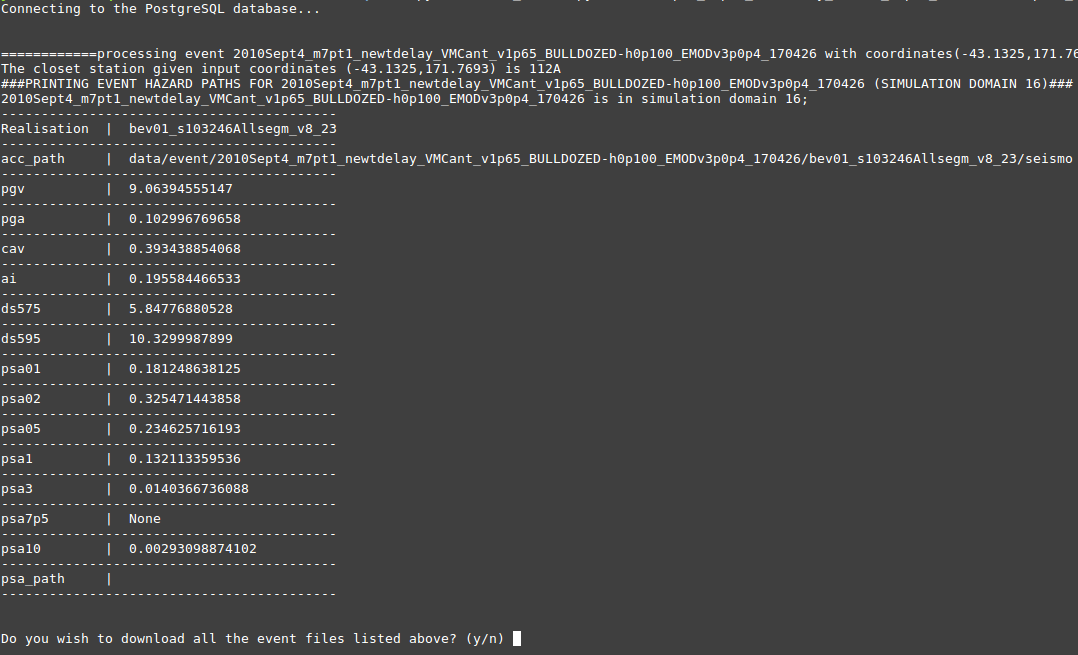
(23) Test Sample test for event_search.py
| Code Block |
|---|
seisfinder2/sqlsts $ python event_search.py -q Kelly_m7pt25 -41.7483e 2010Sept4_m7pt1_newtdelay_VMCant_v1p65_BULLDOZED-h0p100_EMODv3p0p4_170426 -c -43.1325 171.48317693 -r Kelly_HYP03-03_S1284bev01_s103246Allsegm_v8_23 |
Output: