For the instruction here, you need Dropbox UC Enterprise account. Storage | University of Canterbury
UPDATE ( ) : Note that QuakeCoRE's Cybershake archiving is now processed by the in-house-developed automation tool ( https://github.com/ucgmsim/cs_dropbox_sync ) which uses rclone under the hood. We keep this page for other UC researchers who might find this information interesting.
Already have an access code
If you already have an access code, skip "Getting an Access Token" part. Just place it at $HOME/.config/rclone/rclone.conf.
This file should look like
[dropbox]
type = dropbox
client_id =
client_secret =
token = {"access_token":"XXXXXXXXXXXXXXXXXXXXXXXXXXXXXXXXXXXXXXXXXXXXXXXXXXXXXXXXXXXXXXXX","token_type":"bearer","expiry":"0001-01-01T00:00:00Z"}
Make sure you load rclone module.
module add rclone
Getting an Access Token
You need `rclone` on NeSI/Hypocentre (or whatever Linux box). On NeSI, you can access it with module command on Mahuika (doesn't work on Maui)
module add rclone
If you are on Nurion or other Linux host, you can download rclone from https://rclone.org/downloads/ . I tested Linux zip version, and it worked perfectly.
You will be accessing Dropbox via SSH terminal, not via Webbrowser as you do normally, so you need to configure it and get an access code.
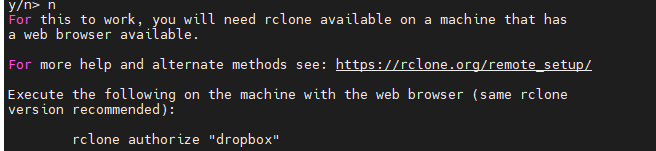
Follow the instruction in this page : Dropbox (rclone.org) - The documentation can be a little bit outdated. Follow the default values until you are asked if you wish to use "autoconfig" - Say No
This will tell you to execute a command `rclone authorize "dropbox"` on a computer that has both web browser and rclone.
Install rclone on your local computer: This step needs a webbrowser so that you can log in to Dropbox and retrive access code.
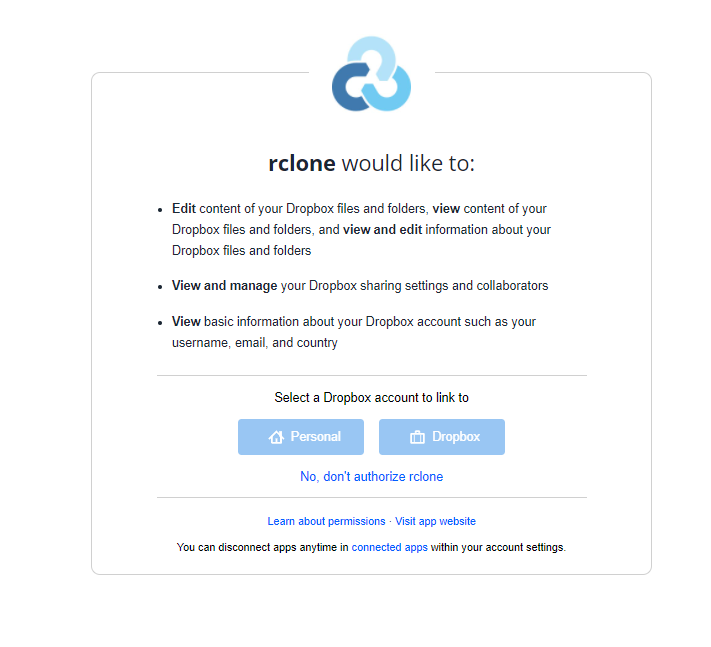
Open a command prompt (on Windows) or a terminal (on Mac/Linux), enter `rclone authorize "dropbox"`. This will open a web browser and show you an authorization screen. Select Dropbox (I think it is meant to be Enterprise).
The next page of your webbrowser will say something like "Success" (Sorry, no screenshot). This page itself has no important information. Go back to the terminal (or command prompt screen), and find your code. It says Paste the following into your remote machine......End paste. Copy that.
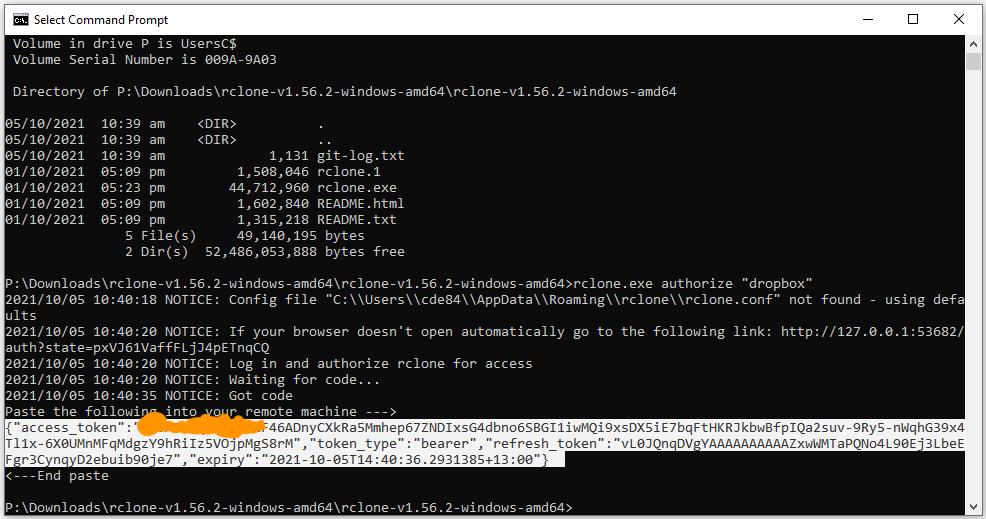
and go back to the NeSI (or the Linux host where you want to set up rclone) terminal . Paste the code.

By default, the remote storage name is "remote". I chose to Rename remote to "dropbox" (Option r)
Quit the config. You should have a config file here.
$HOME/.config/rclone/rclone.conf
which looks like
[dropbox]
type = dropbox
client_id =
client_secret =
token = {"access_token":"XXXXXXXXXXXXXXXXXXXXXXXXXXXXXXXXXXXXXXXXXXXXXXXXXXXXXXXXXXXXXXXX","token_type":"bearer","expiry":"0001-01-01T00:00:00Z"}
Notice "dropbox" inside the bracket. This is the remote storage name, which I renamed from the default name "remote"
Using Rclone
Try
rclone lsd dropbox:
If you didn't rename it to "dropbox", it will be
rclone lsd remote:
If you can see a output similar to below, you now have the access to Dropbox. Congratulations.
(python3_mahuika) baes@mahuika01: ~$ rclone lsd dropbox:
          -1 2020-10-20 01:00:56        -1 backup
          -1 2020-10-20 01:00:56        -1 emp_ds
Some useful commands.
List all the files in your dropbox
rclone ls dropbox:
To copy a local directory to a dropbox directory Cybershake/v21p1 (should exist)
rclone copy v21p1 dropbox:Cybershake/v21p1 --progress
Meaning, everything under the directory v21p1 (note: v21p1 itself is excluded) will be copied to Cybershake/v21p1. It doesn't auto-makedir, so you should make a folder named "v21p1" under Cybershake first.
rclone copy behaviour
rclone copy {src} dropbox:{dest}
1. {src} is a file, and {dest} is a file : a simple file copy.
2. {src} is a file, {dest} is a directory, the file named {src} will be placed under {dest}
3. {src} is a directory, {dest} is a directory, all files under {src} will be copied to {dest}. No directory of name {src} is made under {dest}
4. {src} is a directory, {dest} is a file, error.
- --progress gives progress.
- You can assume as long as a file is listed on Dropbox folder, its upload is "complete" - it does basic file size and time stamp check and the exact file copy is "almost" guaranteed.
- If you terminate the upload command, and restart, it will skip the files that have been uploaded already.
- The upload is NOT fast. 50Gb takes about 5 hours. It's best to run it on the login node, but in "screen". For more info about screen, see Linux Screen Tutorial With Examples – POFTUT
Dropbox has undocumented maximum file size of 340Gb. If you r file is larger than that, split them into multiple parts before upload
split -b 340G $TARNAME "${TARNAME}.part"To merge split files, use the following command.
cat ${TARNAME}.part* > $TARNAME
To copy a single file to a specified location, give the dest file name, for example,
rclone copy Akatore/Akatore_REL01/BB/Acc/BB.bin dropbox:Cybershake/v21p6/v21p6_100m_BB/Akatore/Akatore_REL01/BB/Acc/BB.bin -vv
If desired, you can add a bit more intelligence here.
Suppose we have faults.txt, a list of fault names. We want to back up BB.bin under these faults only.
cat faults.txt |xargs -I {} find {} -name BB.bin |sort |xargs -I {} rclone copy {} dropbox:Cybershake/v21p6/v21p6_100m_BB/{} -vv
To generate a link to file or folder to share
rclone link dropbox:path [flags]
For more info, check out https://rclone.org/dropbox/