These instructions refer to installation of EndNote X7 on your own PC or laptop – they assume WindowsXP. Mac users should consult the information about using EndNote on a Mac. Ensure any earlier versions of EndNote are removed before installation of X7.
Using Office
EndNote X7 is compatible with Office 2013 and earlier. See the EndNote site for up-to-date details on compatibilities.
Step 1: Install the software
Download the software from the links on the EndNote Software page.
If by any chance you cannot download the software, you can borrow the EndNote installation CD-ROM from the ICT Service Desk. You'll be asked to show your UC ID.
Before you install the software, you must extract the files – your installation will not work otherwise. To do this, follow the extract instructions on the EndNote Software page referred to above.
For Windows installations the file to run is UC_EndnoteX7.exe.
Step 2: Install the additional Filters, Connection Files and Output Styles
The Library provides some modified and additional Filters, Connection files, and Styles which are useful for this University. What are Styles, Filters and Connections? An example of a connector you may want is one that allows direct, although limited, searching of the UC Library Catalogue (this connector is called U Canterbury.enz).
Once EndNote is loaded you will need to copy these files to your laptop or PC.
- In the file that you downloaded, there will be a folder called UC_Styles which contains sub-folders for each of filters, styles, and connection files. Alternatively, download from the Library web the following compressed folders: filters.zip, connections.zip & styles.zip. Note that any zipped files need to be 'unzipped' i.e. right-click and choose the extract command.
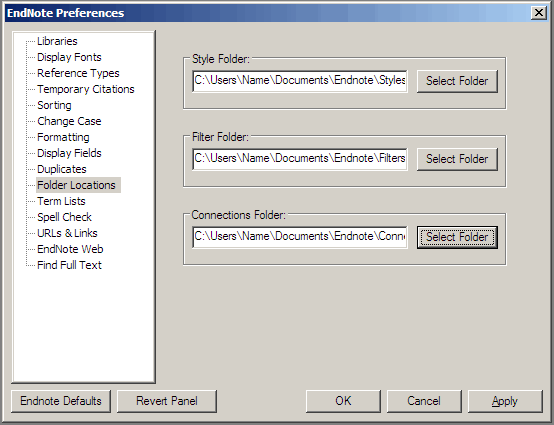
- Locate the Filters, Connections and Styles folders on your computer (these folders should have been created during the EndNote installation process). To locate them go to EndNote > Edit > Preferences > Folder Locations:
The folder names will be different on your PC. This screenshot shows a vista-version, but 'Name' will be dependent on your PC. If nothing shows in these folders, you can either create folders for them, or copy the files into the appropriate folders directly under C:\Program Files (x86)\EndNote X6 - but in this case you will have to re-copy the files if you ever upgrade. - Extract the compressed Filters, Connections and Styles into these folders.
Installation problems
If you have problems after installation (e.g. no toolbar in Word) our problems page may help, as may the EndNote site.
Updates
From time-to-time EndNote release patches and upgrades to EndNote. To check for these, Click Help, then EndNote Program Updates
